Sunday, September 27, 2020

Sketchbook B

 Reflection

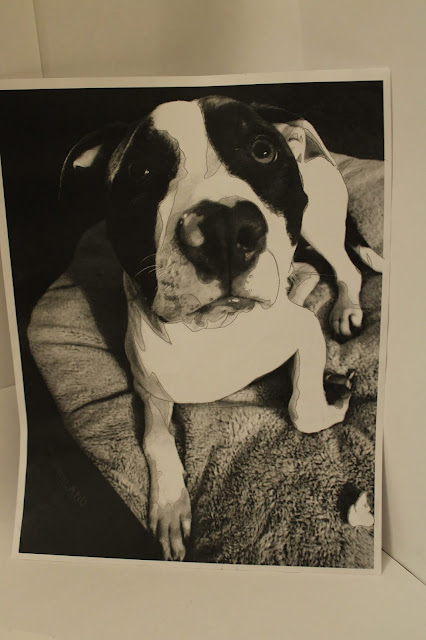
The first image is the original image take of my dog then converted to grayscale. I chose a picture of my dog vs a human face because I wanted to really challenge myself. I have done human faces numerous times and animal faces are much harder because of the structure and fur. The second is the carbon paper drawing in which I outlined as many different value differences I could pick up. The last photo is the final project. My biggest issue is that the material I was using I was not used to so when I got all the colors I wanted I went back and they were all dried. So I had to lessen the different gray tones so I can work faster with what I was allowed.

Original Photo

I couldn't figure out the app thing so I tried to imitate it using my phone filters


Sketche


Final Image

I love this too much to redo it completely


Assignment 1

 Sketches


These are rough sketches of my ideas for lines linked to emotions.


These are the intial rough sketches where I went around Sheboygan observing the environment, asking people about their thoughts on the environment, and seeing the world through an artist eyes. 


The following are my final compositions with the emotion I was trying to convey underneath.


Frustration 


Innocence 


Choices/Indecisiveness 


Humble


Chaos


Overwhelmed

Weekly upload 1

 Weekly upload 1. What I did for the photographs selected were mostly wander around Sheboygan with my dog, camera, and tripod. That was difficult. I just walked around then anytime I saw something that inspired me I took pictures using my histogram to determine the correct composer. Every week I will have to travel farther to find more interesting subjects. I just hope one of these days I don't get stopped because I am a weirdo carrying a big camera around. 


Short 3


For this interior image I captured it at 1/4 sec, f/5.6, ISO 400. A low ISO results in a less textured picture allowing clearer lines especially in a setting where there is a decent amount of light. Also the poster itself is quite bright even in the dark. 

For this interior image I captured it at 1/15 sec, f/22, and ISO 6400. A higher ISO means the image is more grainy. You can see that by how the lines start to blur together more. Also the image already is a textured poster so it is almost like you are standing next to it with your glasses off. 

This exterior image was captured at 1/100 sec, f/5.6, and ISO 100. The grain of the ISO is very low which allows for a clearer crisper image in the daylight. I used a histogram to balance out all the photos when I captured them. 

This exterior image was captured at 1/60 sec, f/36, and ISO 1600. The high ISO creates a grainer image which you can see by how the words on the sign start to fade together, the tree branches and leaves are merging into each other, and the lines of the stone blur together. 

Technical Assignment #3


For the interior photo using a window it was really hard to figure out the settings. For the image above I managed to capture this at 1/8sec, f/10, and ISO 400. I had my histogram up and I kept adjusting my settings until the picture was in the good range. My biggest challenge was trying to balance the outdoor light with my very poorly lit apartment. 

For the photography above the settings I captured it at were 1/100 sec, f/7.1, and ISO 800. I used my histogram to see if the photo was balanced. Unfortunately I was not able to problem solve and ISO 800 was the highest I could get and you can still see the image. If I were to do this again I would have to try and figure out how to introduce more light such as pointing a light at my subject. 

For the image above the data I captured it is 1.6 sec, f/22, and ISO 800. This was the most challenging photos to take. My original attempt was dusk and all of them turned out blurry. For these my main goal was trying to capture as many tonal changes in the sky as possible while also trying to figure out how to take a high ISO without it turning completely black. If I had to try this again I would drive down to wherever their is a better space to capture the sun. This was taken on a street that I never knew was blurry so the cars added lights and disappearing lights made it much harder. 


For the image above the data it was captured at is 10 sec, f/22, ISO 200. Because the sun was rising it was hard to adjust the other settings to compensate for all the differences in light that was going on without having a photo that is a white blur. I used a histogram to take these photos.

The challenge image metadata is 15 sec, f/5.6, and ISO 800. For this photo I adjusted my camera to point down the stairs in the pitch black. By capturing it with these settings and the angle you can see the light being projected from outside reflecting on the sides and the stairs. You can also see three distinct colors of light which is really cool. 

Thursday, September 17, 2020

Short 2: 3 Cups

For these two photographs I arranged four wine glasses in a line and filled them with water in a descending order. Full glass, three quarters glass, half glass, and fourth glass. I then went around the house trying to find anything I can to color the glasses to as close as I can get to yellow, green, red, and blue. The top photograph settings were set at 1/20 sec, F/5, and ISO 1600. The bottom photography settings were set at 1/4 sec, F/36, and ISO 1600. 


Technical Assignment #2

 Technical Assignment #2 is all about how the difference in aperture can change the way an image look. This is demonstrated by creating a still life then taking duplicates of the same frame but changing the aperture and the shutter speed respectively. This knowledge will help when building a photograph for what kind of impact you are striving for. 


The top image photography settings was captured at 1 sec, F/22, and ISO 200. The bottom image photography settings was captured at 1/20 sec, F/4.5, and ISO 200/ The top image had an aperture that allowed less light in and created a greater depth of field which can be seen by how the background doesn't fade away. The bottom photograph had a larger aperture which let more light in creating a shallow depth of field which can be seen by how the background starts to blur. 


The top image was shot at 1 sec, F/22, and ISO 200. The Bottom image was shot at 1/20 sec, F/5, and ISO 200. The top image the aperture creates a greater depth of field creating an illusion of the image being more dimensional. The aperture allows less light in and the shutter speed allows for a sharper image. The bottom aperture lets more light in creating a more shallow depth of field resulting in the background to be blurry. 


The two pictures above were shot at 1/20 sec, F/5, and ISO 200 and 1 sec, F/22. and ISO 200 respectively. What this means is that the top picture had a wider aperture and a faster shutter speed allowing more light in, clearer image, and shallow depth of field. The bottom picture has a more narrow aperture which filters out less light, taken at a slower shutter speed to allow more light in, and has a greater depth of field. The top one the base of the vase is a bit blurred out focusing more on the foreground. The bottom one the base is more clear and with its greater depth of field makes it more dimensional. 


This is a profile picture of my dog Spike. It was very hard to achieve this photo because he has doggy ADHD. The picture is 1/30 sec, F/5, and ISO 200. The way aperture contributed to this photo is it allowed more light in which causes his white fur to stand out more along with the shadows cast from the blankets to the individual grooves of his form. This also creates a shallow depth of field allowing the background to slowly fade away so all your attention is on him. Which he loves. 

Sunday, September 13, 2020

Short one panning.

 Panning is when you set your shutter speed down low and quickly zoom in and out when you snap the picture.. The following two images I created by zooming in and out on different light sources to try and draw the light out of the air. 


Technical assignment #1

 Shutter speeds can change how a photograph is taken by extending or freezing the object in motion.


These two photographs are examples of a slow shutter speed. It catches the movement of the object creating a path you can see. About 1/10 shutter speed The top picture is of my dog running towards me and the bottom picture is waves crashing during rain. How I took the picture is I threw the ball repeatedly taking as many photos I can with the flash on due to poor lighting in my bedroom. For the bottom photo I took when I was close to it and watching the water fall over itself. If I used a fast shutter speed then I would have a more precise and clear image where the action is frozen in time.

The last two pictures are example of a high shutter speed. It froze these two images resulting in a super sharp and intriguing image. In order to get these images I zoomed in and maneuvered around to get the best angle and took multiple shots for comparison. I used about a 1/6000 shutter speed. If I were to use a slow shutter speed we would see a more blurry image due to the camera recording its path.

Challenge image recreation:
The challenge image I had a lot of fun recreating the image. Since I can't control the weather I used that knowledge to help re create this. I was standing on the slippery rocks waiting for the perfect moment to take as many photos as I could. I spent a couple hours outside in the rain to get this image. If I used a slower speed it would be harder to make sense of it.